We recently achieved two important objectives in our collaboration with VeloxChem:
- We helped port the code to compile and run natively on Windows, and
- We uploaded binary packages for Linux, macOS, and Windows to Anaconda Cloud.
These are important objectives for ENCCS and VeloxChem, as they:
- Expand the reach of the code in the community,
- Lower the barrier to install and try out the code,
- and will help greatly in organizing advanced training workshops as well as illustrating the concepts of molecular quantum mechanics in basic education.
In this blog post, I will explain how our continuous deployment (CD) of the binary package works. The fundamental philosophy is to treat infrastructure as code, such that deployments are reproducible, version-controlled, and self-documenting. Throughout the post, I will refer to an example project hosted on GitLab: https://gitlab.com/robertodr/pybind11-mpi4py. The conda recipes and deployment infrastructure are instead hosted on GitHub: https://github.com/enccs/meta-vlx.
Note that I will not be discussing how to prepare a conda package, but rather how to build one once all its components, code and metadata, are in place. If you are interested in these aspects, you should head to the conda-build manual and conda-forge knowledge base.
The use case scenario is as follows:
- The repository with the code to be packaged is hosted on GitLab. The visibility level of the development trunk is set to private.
- We want to use GitHub actions to deploy the conda binary package. GitHub actions are available for Linux, macOS, and Windows.
The idea is to implement a GitLab-GitHub round-trip through the corresponding HTTP public APIs:
- On GitLab, we will perform commit-level continuous integration (CI) for the development trunk. Through metadata in the commit message, we will set up a deployment event. Each deployment event will send a HTTP request to GitHub.
- On GitHub, we handle the deployment event request. This means sending a HTTP request to GitLab to download a tarball with the code and then invoking conda-build to build the binary packages for all platforms and variants.
HTTP requests will be the communication layer between the two hosting platforms. To avoid leaking sensitive information, all requests will be authenticated using personal access tokens (PATs).
On GitLab
Configuration
We start by generating a PAT and registering it on GitHub:
- Follow the instructions here: https://docs.gitlab.com/ee/user/profile/personal_access_tokens.html#creating-a-personal-access-token
- Limit the scope of the PAT to read_api.
- Save it somewhere safe on your local machine! For example a password manager.
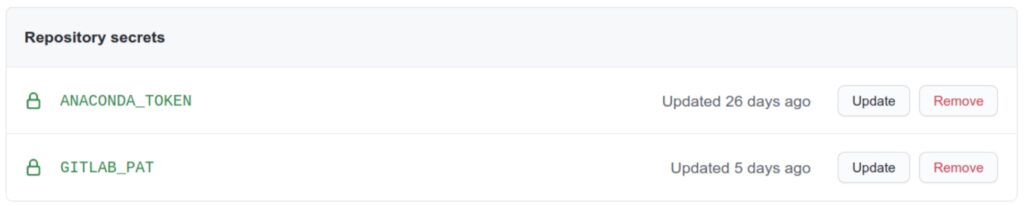
With the token at hand, add it as a secret on the GitHub repository containing the recipes. Call the secret variable GITLAB_PAT. Whether it should be an organization or repository secret depends on the visibility level you need. For our purposes, a repository secret is enough.
Workflow
The whole workflow is encoded as a CI pipeline in the .gitlab-ci.yml file:
- Perform the commit-level continuous integration builds for the development trunk.
- If CI passes and if the commit message contains the tag [conda-build] in the title, generate a tarball with the source code.
- The tarball is saved as a build artifact on the GitLab CI server.
- Run the Python script trigger.py in the .gitlab folder of the repository. The script will:
- Prepare the JSON payload of the HTTP request to GitHub.
- Send a POST request to GitHub. This uses the requests Python library.
POST request payload
The trigger.py Python script does the heavy lifting in the Gitlab-to-GitHub portion of the round-trip. The GitHub API accepts data in JSON format. The data we decide to send is:
- The name of the recipe to build. In our example pb11mpi
- The URL from which to download the source code tarball. Only authenticated and authorized users can download successfully: even if the URL is publicly visible, its content cannot be accessed by unauthorized third parties.
- The SHA256 checksum of the tarball.
- The version and build numbers.
- The channel and label of the conda package.
- A patch for the __init__.py file. The patch is used to timestamp deployment.
Version, build number, channel, and label can be customized in the commit message. The script parses the body of the commit message (the description) for a JSON string with these parameters. An example of commit message for a fully customized package is as follows:
Deploy experimental package [conda-build]
 package = {"version": "0.1.0.dev10", "build": "1", "channel": "robertodr", "label": "dev"}
On GitHub
Configuration
Since we will access the GitHub API from GitLab, we need a PAT:
- Follow the instructions here: https://docs.github.com/en/github/authenticating-to-github/creating-a-personal-access-token
- The PAT needs at most the repo and workflow scopes.
- Save it somewhere safe on your local machine! For example a password manager.
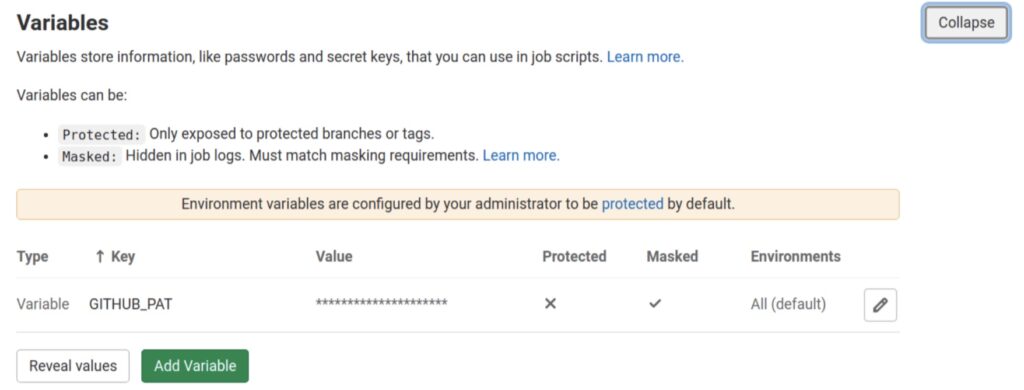
Once the token is generated, add it as a CI/CD variable on the GitLab repository that will trigger the deployment. Call the variable GITHUB_PAT. The variable should be masked, but not protected. The former makes sure that its value is not leaked to the pipeline log, while the latter makes it available to all branches in the project, not just protected ones.
Workflow
Once GitHub receives the POST request from GitLab, it will go through the steps in the deploy-cxx.yml action:
- It will download the tarball from the URL provided in the payload of the request. Upon successful verification of the SHA256 checksum, the tarball is unpacked.
- The patch received with the payload is written to file in the appropriate subfolder.
- The build environment is set up.
- The metadata YAML file is stored on the repo as a template. Before building, we need to configure it with the parameters obtained from the POST request payload.
- Finally, we invoke conda-build to generate and upload the binary package.
Conclusions
The technique I have shown in this post is quite general and the trigger.py Python script can be readapted for any kind of one-way communication between the HTTP APIs of any online service. For example, one could adapt our framework to extend the number of toolchains and platforms tested during CI.
RECENT NEWS
[post_grid id=’651′]